BLFS Developer: Domain and VPS Setup
What we're starting with
At this point the Shopify merchant should provide the developer with three things:
-
A receive-only NWC CODE from their wallet or node.
The NWC code starts with...
nostr+walletconnect://... -
The merchant's unique SHOPIFY STORE DOMAIN that ends with
.myshopify.com(e.g.,anna-jaques.myshopify.com). -
A brand image URL — A publicly accessible image link (
.png,.jpg, or.webp) that represents the merchant's brand.
Let's test the domain to make sure it's valid
The developer should now put the SHOPIFY STORE DOMAIN (eg anna-jaques.myshopify.com) into a browser to make sure it correctly loads the merchant's Shopify store. If it doesn't load the merchant's store, go back to the merchant to troubleshoot.
Set up a VPS to run BLFS
To run BLFS, you need some kind of Linux computer "in the cloud" -- it should be "in the cloud", and not on your local network, so that your merchant's customers can reach it with low latency.
This BLFS instance will be generating invoices, so it needs to respond very quickly. It doesn't require much CPU, but it does really really fast network access - that's why it's perfect to run in a data center.
Sometimes people call these Linux computers in the cloud a "VPS" (virtual private server) or "cloud server".
Minimum recommended specs:
- 1 vCPU
- 2 GB RAM
You can get a VPS (virtual private server) from any cloud provider. Recommended providers include:
... but feel free to choose any provider you like.
(Note: If you are REALLY confident in your own internet connection, and your PROMISE that your internet almost never goes down, and can expose an IP addresses to the public internet, you can run BLFS on your own network. But we don't recommend it. Your latency is not as good as a data center's latency!)
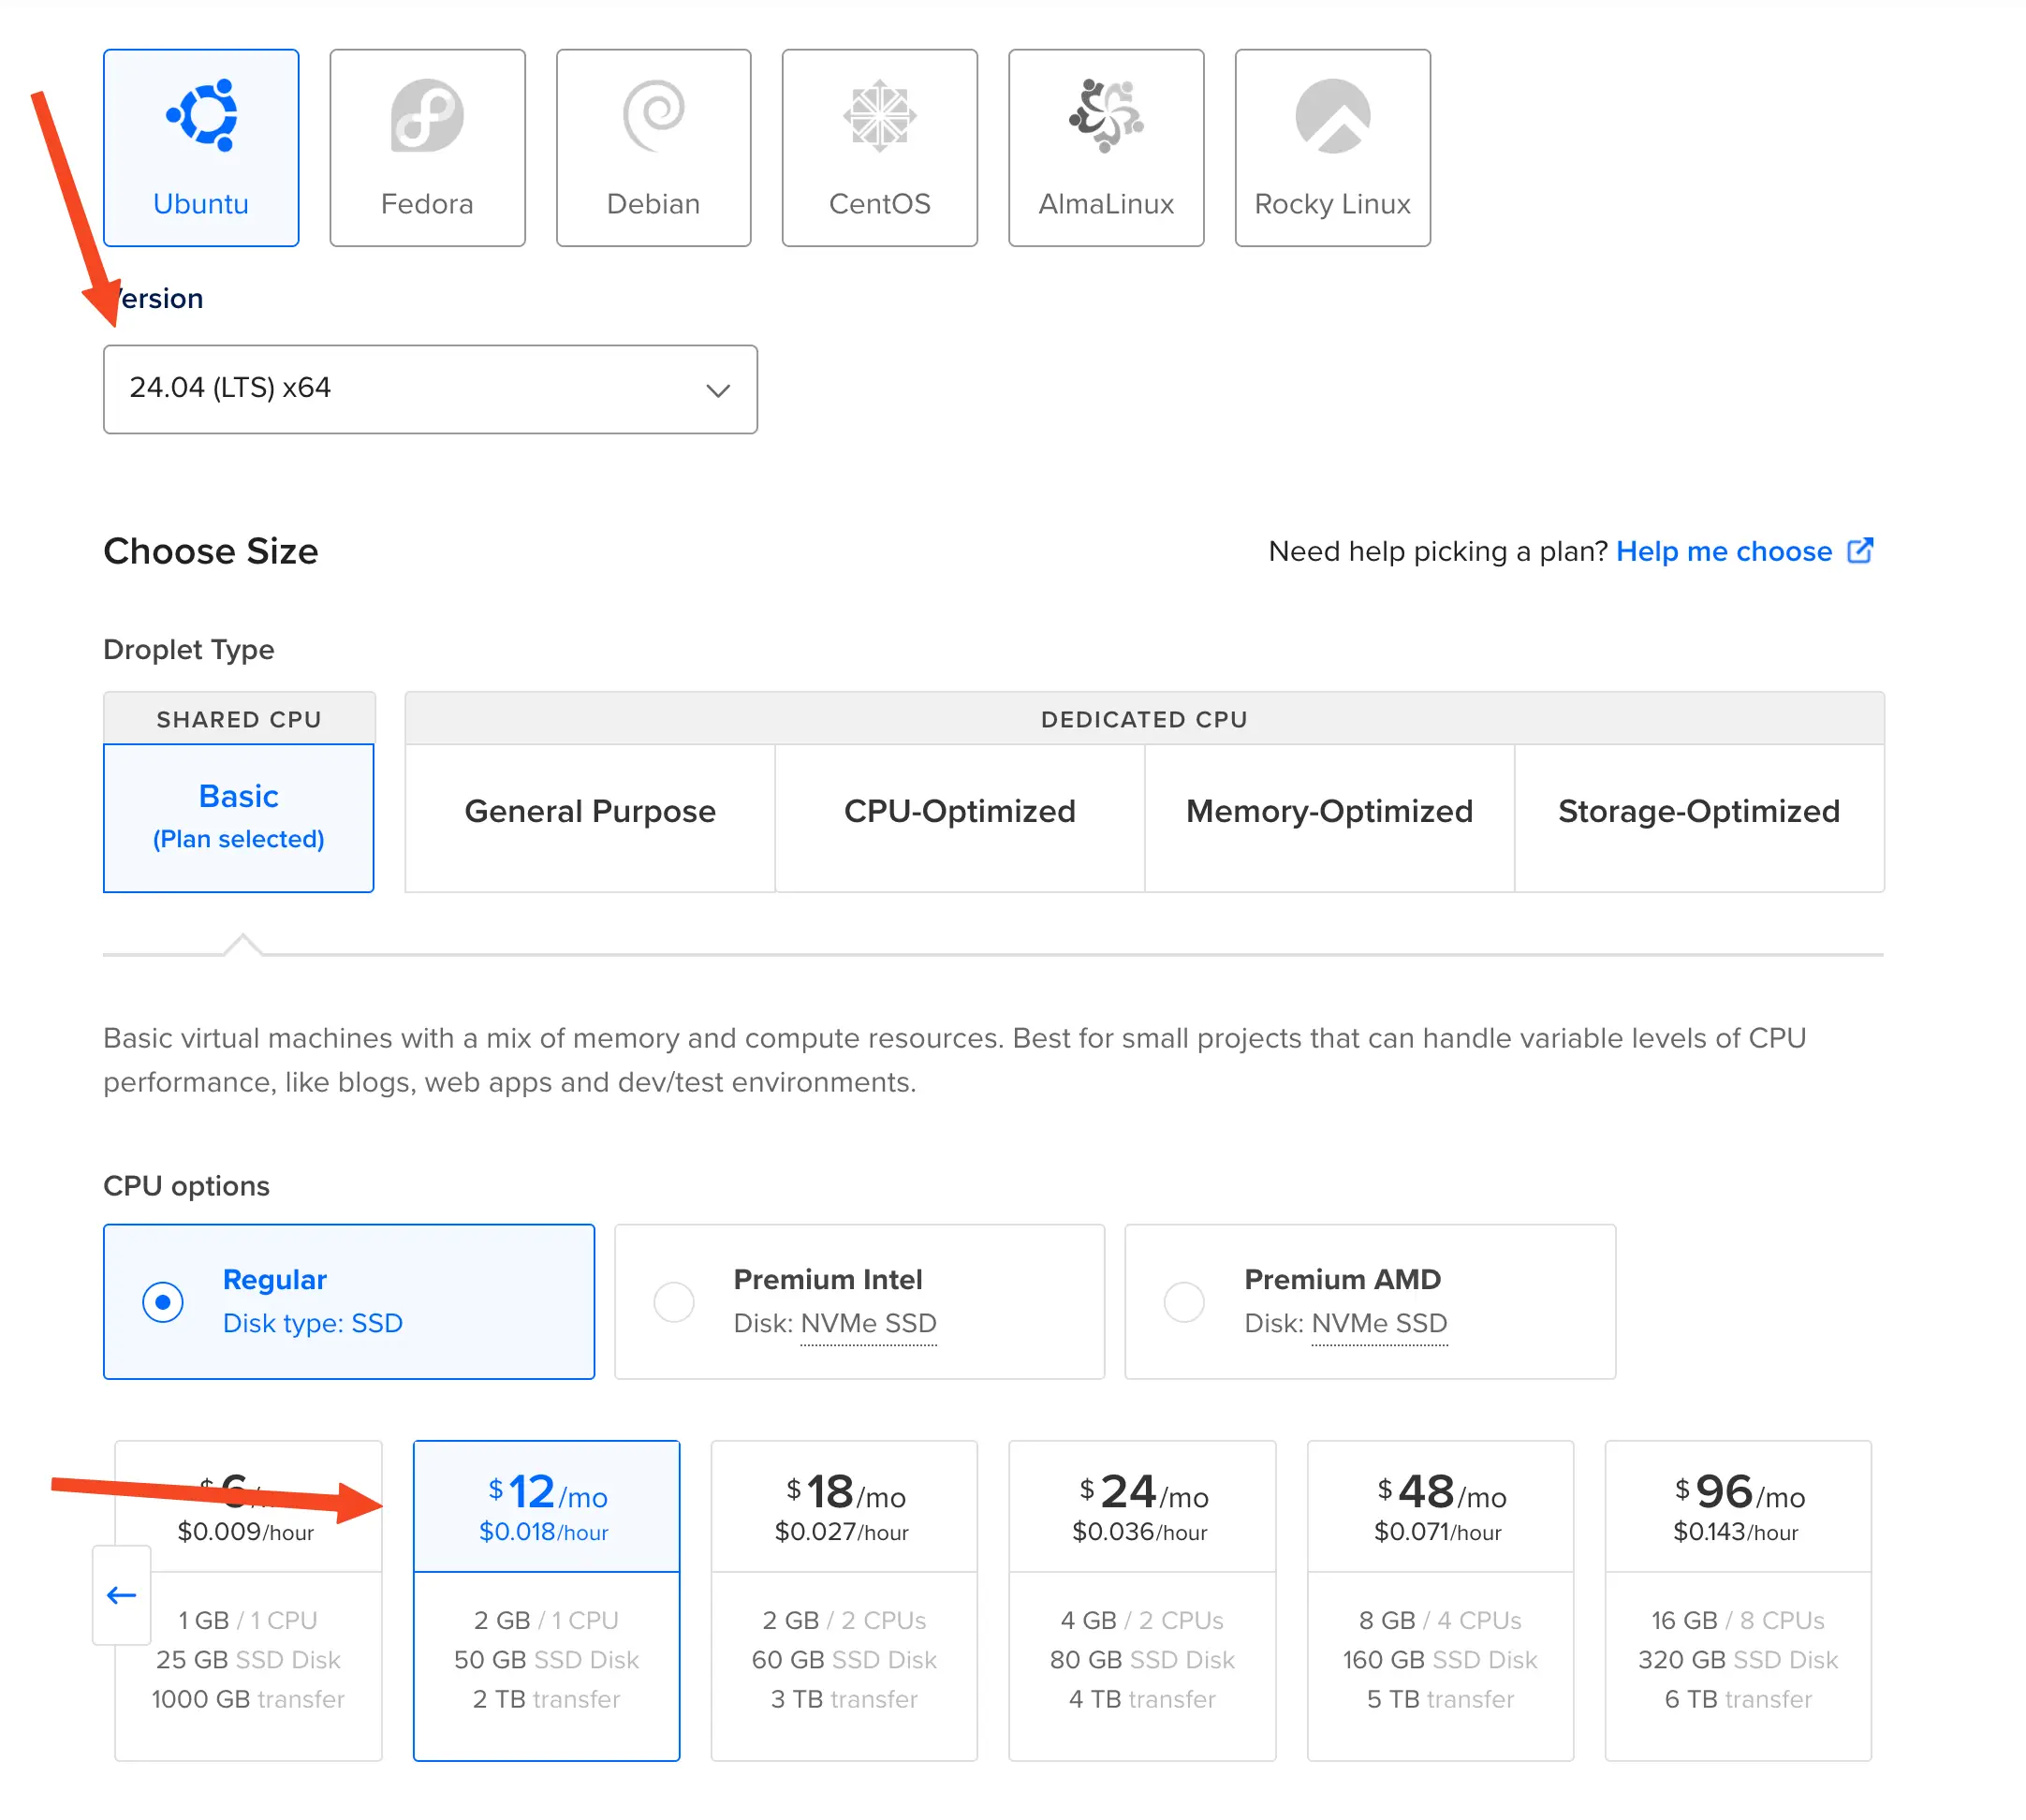
Anyway -- the example here is with Digital Ocean, where a VPS is called a "Droplet". You can see, below, I have chosen a "Droplet" configuration with Ubuntu 24.04 LTS, 1 vCPU, and 2 GB RAM, from Digital Ocean:
Connect via SSH to your VPS & Install Prerequisites
Once your VPS is ready, connect to it on the command line via SSH.
Then...
-
Ensure you have some swap allocated -- you can ask an LLM "How to I allocate swap on Ubuntu", or follow these directions -- BLFS doesn't use much RAM, but if you end up connecting to this VPS with a heavyweight IDE like Visual Studio Code, swap can help avoid out-of-memory crashes. We recommened at least 2 GB of swap.
-
Install Docker and Docker Compose. You can follow these directions to install Docker on Ubuntu, or if you're feeling lazy, you can run:
curl -fsSL get.docker.com -o get-docker.sh && sh get-docker.shYou might need to open a new console window, and then you should then test that Docker is installed correctly by running a test container:
docker run hello-worldIf something goes wrong there, ask an LLM to help you troubleshoot Docker.
-
Make a note of the IP address of your VPS -- you'll need it soon. For this tutorial, we'll assume the IP address is
147.182.243.148.
Get a domain, or repurpose an existing one
To run BLFS, the developer needs a domain name. This can be a new domain, or an existing one that the developer already owns. Some notes about the domain:
-
The domain does NOT need to be related to the merchant's store name.
-
You can support multiple merchants on a single domain.
For this tutorial, we'll use
blfs-example.comas the domain.
Choose a subdomain to make a complete Hostname
You need to choose a subdomain for BLFS. This can be anything you like, as long as it is not already in use on your domain. In this case, we'll use the subdomain...
pay
..... so the full HOSTNAME will be:
pay.blfs-example.com
Point an "A" record to your HOSTNAME
Now, make a new "A" record in your domain's DNS settings, pointing the HOSTNAME to the IP address of your VPS.
The interface for this will vary depending on your DNS provider, but it should look something like this:
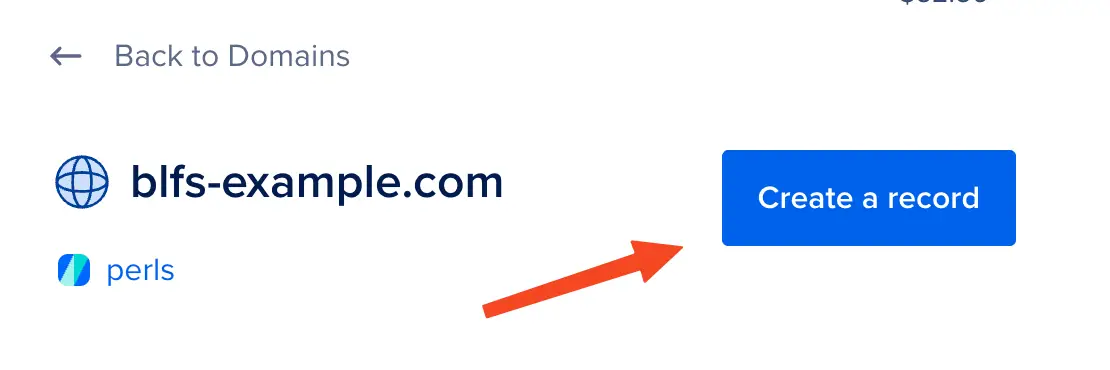
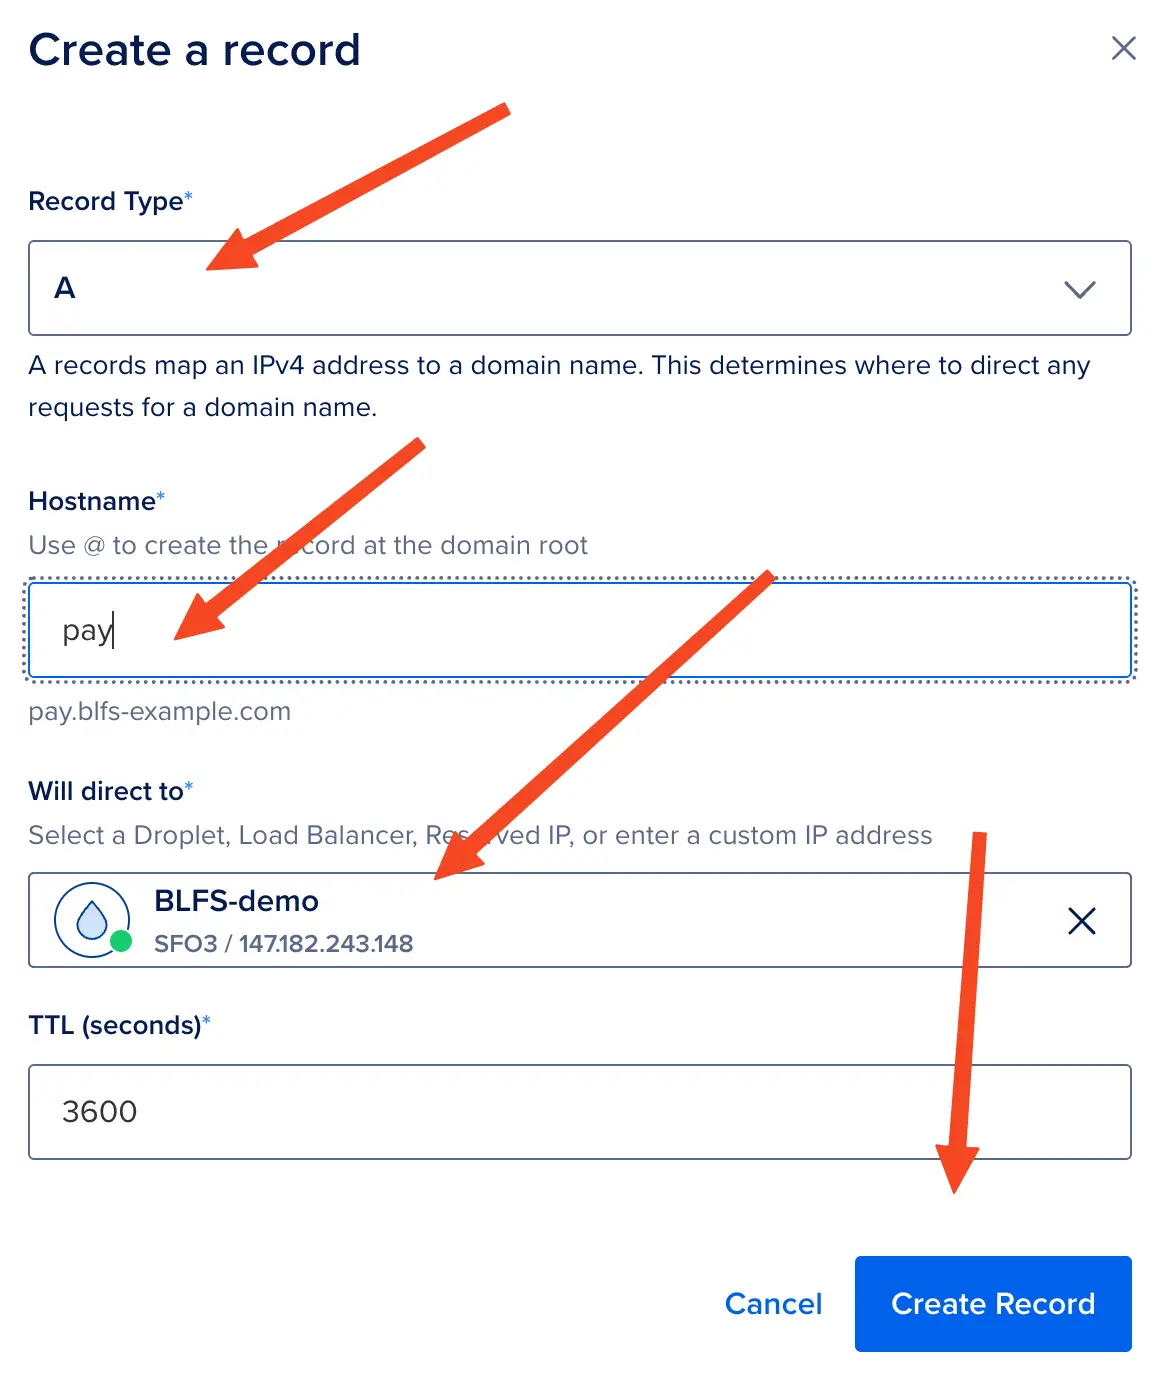
If you haven't done this before: Beware. Different DNS providers have different interfaces... you can see here that I just specified pay as the Hostname.
It's easy to get this wrong, so, after you do this, you should head over to a DNS propagation checker like whats my dns to make sure your HOSTNAME is correctly pointing to your VPS IP address.
Clone the BLFS repository
Make a workspace directory on your VPS, and cd into it:
mkdir -p ~/workspace
cd ~/workspace
Then, clone the BLFS repository:
git clone https://github.com/MegalithicBTC/BLFS
cd BLFS
Next, we're going copy the example .env.example file to a real .env file that we can edit:
cp .env.example .env
Now open the .env file in your favorite text editor (e.g., nano .env). Let's look at the three variables you need to change:
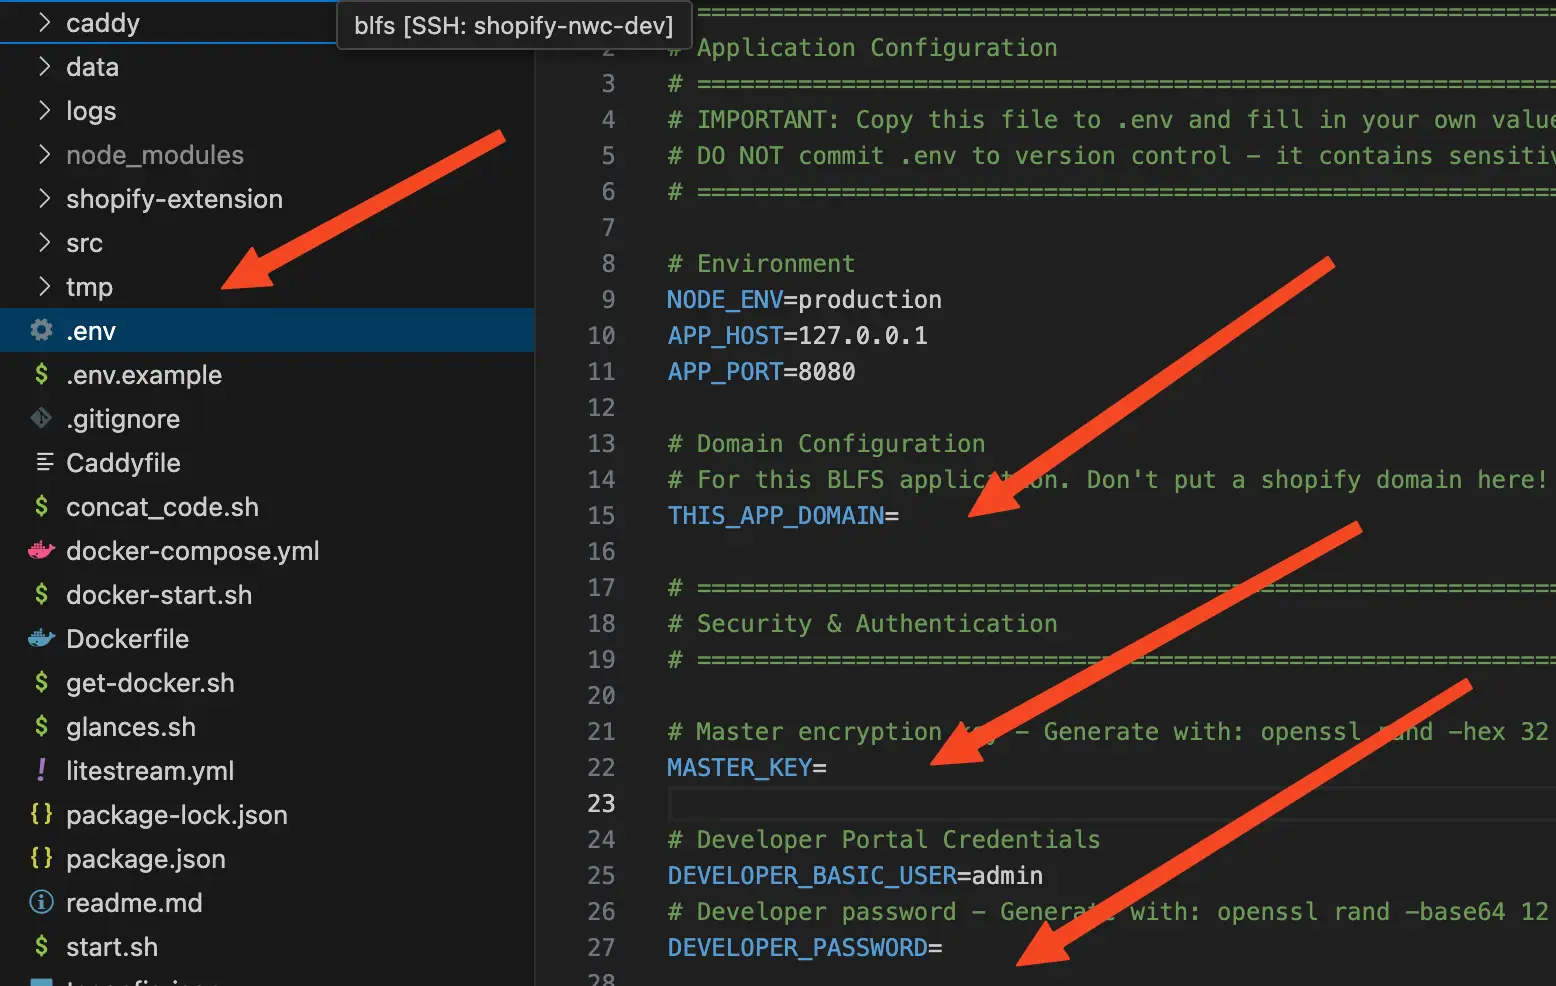
Set 3 Variables in the .env file
- Set the
THIS_APP_DOMAINvariable to yourHOSTNAME(e.g.,pay.blfs-example.com)... so it should look likeTHIS_APP_DOMAIN=pay.blfs-example.com - The
MASTER_KEYneeds to be a 32-byte hex string. Use this command to generate one:Then copy the output, and paste it into theopenssl rand -hex 32MASTER_KEYvariable, so it looks like:MASTER_KEY=your-long-random-string-here - Finally, set the
DEVELOPER_PASSWORDvariable to a password of your choice. This password will be used later to log into the BLFS admin interface. For example:DEVELOPER_PASSWORD=your-password-here
You should keep backups of the .env file, especially the MASTER_KEY -- your BLFS database will be encrypted with this key, and if you lose it, you will not be able to recover your data.
Now save the .env file and exit your text editor.
Change the currency in the .env file (if needed)
By default, BLFS is set to use USD as the currency. If your merchant wants to use a different currency, you can change the CURRENCY variable in the .env file to the desired currency code.
BLFS supports the following currencies:
USD, AED, ARS, AUD, BDT, BHD, BMD, BRL, CAD, CHF, CLP, CNY, CZK, DKK, EUR, GBP, GEL, HKD, HUF, IDR, ILS, INR, JPY, KRW, KWD, LKR, MMK, MXN, MYR, NGN, NOK, NZD, PHP, PKR, PLN, RUB, SAR, SEK, SGD, THB, TRY, TWD, UAH, VEF, VND, ZAR
For example, to change it to Euros, you would set:
CURRENCY=EUR
You now have 4 pieces of information
Now, the developer has:
- NWC CODE - The receive-only Nostr Wallet Connect code from the merchant (starts with
nostr+walletconnect://...) - SHOPIFY STORE DOMAIN - The merchant's Shopify store domain (e.g.,
your-store-name.myshopify.com) - IMAGE LINK - The image link from the merchant for the payment gateway logo
- HOSTNAME - Your complete hostname pointing to the VPS (e.g.,
pay.blfs-example.com)
Keep these handy - you'll need them in the next steps when we configure and deploy BLFS.