Alarms and Connectivity Checks
Now, young gentleman, don't think that your time as a routing node operator will be spent in complete leisure!
On the contrary: We are going to set up some alarms, so you'll be sure to be woken up at 3 AM when your node goes down.
But wait, can't I pay some service to send me alarms if my node goes down?
Yes, you can! It's Lightning.Watch. But, then you're trusting someone else to do your monitoring. Who knows if it will really work?
Also: We're going to be implementing some alarms that no commercial service provides (to my knowledge).
What we're going to need
This monitoring setup is a bit complicated, so let's talk about all the parts involved.
- Your LND Node. Let's call this the MAIN LND NODE.start-lnd-and-look-for-the-clearnet-uri
- An application for your phone that can send you loud and annoying alerts. I use this: https://pushover.net/
- A queuing system. I would recommend either SQS, or a hosted RabbitMQ. For this tutorial, we will be using RabbitMQ.
- A VPS server somewhere. Let's call this the VPS QUEUE LISTENER. It should NOT be the same VPS that we set up for your Clearnet IP, but CAN be any VPS running linux in any data center.
- Another LND node. Let's calls this LND WATCHTOWER NODE, as this can be the same machine that you set up in Set up a Watchtower: the hard way.
So in short: Three linux computers, all at different locations, and a queueing system to connect them.
Set up your queues
If you've never used a queuing system before, you're in for a treat: They are incredibly useful for lots of different DevOps and deployment challenges.
For this tutorial, we will be using RabbitMQ. You can set up a hosted RabbitMQ service here: https://www.cloudamqp.com/plans.html
For our purposes, the FREE version should work fine, or you could spring for the $19/month "Hobby" plan.
Again, you could also do this SQS, but I happen to be using RabbitMQ.
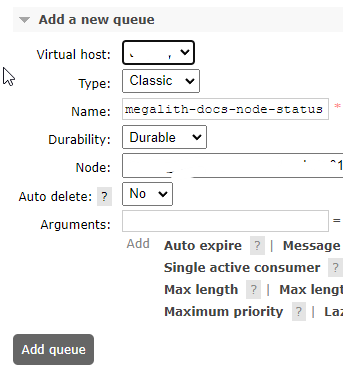
You need to make two queues. Here are the queue "names", and a brief description:
megalith-docs-node-status: This is the queue you will use to constantly send messages from your MAIN LND NODE.
megalith-docs-connectivity: This is the queue you will use to constantly send messages from your LND WATCHTOWER NODE.
Here we are, creating a queue:
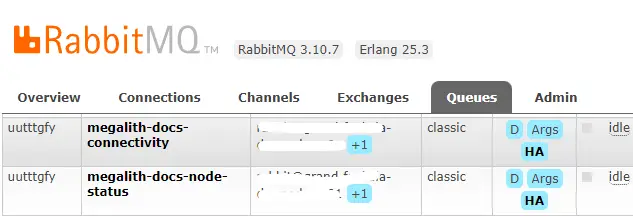
Now, we've created both queues, and we can see them in the list on our hosted service:
Add our queue credentials to our secrets
Your hosted RabbitMQ service will provide you with a single URL that contains all the credentials you need. It will look something like this:
amqps://uasdfasdffy:SEasdasdffasdlkfjalwe3_v6@grand-foo-bar.rmq3.cloudamqp.com/uasdfasdffy
Open the pworker/PRIVATE/secrets.env file, and, after the four lines you specified for AWS credentials, paste in a line to specify the RABBITMQ_URL environment variable to set this URL, like this:
RABBITMQ_URL=amqps://uasdfasdffy:SEasdasdffasdlkfjalwe3_v6@grand-foo-bar.rmq3.cloudamqp.com/uasdfasdffy
Start sending our node status to a queue
On the MAIN LND NODE, run:
./start-send-node-status.sh
This will start sending critical health information about your LND to the megalith-docs-node-status queue. Messages will send every ten (10) seconds. In your RabbitMQ console, you should be able to see the messages "accumulating" in the queue, like this:

From here forward, you should be running this script 24/7 on your LND node.
Start sending our connectivity status to a queue
If you remember back in A Clearnet IP For Your Node, we ran a basic test using the nc (netcat) utility, to make sure that we could receive incoming packets on port 9735.
That works OK, but we need to automate this, so we will be CONSTANTLY checking to confirm that our node is available for incoming connections on the Network.
And to do this, we need to run these checks from a computer that is running LND, but running it from a totally different network connection and physical location.
Luckily, if we've done the Set up a Watchtower: the hard way tutorial, we ALREADY have an LND instance up an and running that fits these requirements, and we can use this same computer to continually test our connectivity status.
Move over to your Watchtower computer now
Remember how we discussed remote access to your node? When you start juggling different computers like this, in different physical locations, you really are going to need remote access to them. Otherwise this sort of stuff is nearly impossible to set up.
Get on the command line on your LND WATCHTOWER NODE.
Just to confirm, your LND WATCHTOWER NODE must be in a different physical location from your MAIN LND NODE.
Assuming your Watchtower was already running, you currently have three (3) terminal windows open on the LND WATCHTOWER NODE.
- Bitcoind, started with the script
./start-bitcoin.sh - Tor, started with the script
./start-tor.sh - LND (in watchtower mode), started with the script
./start-watchtower.sh
Now open a 4th terminal window.
Add your RabbitMQ credentials to the Watchtower computer
Now, on your LND WATCHTOWER NODE, In pworker/PRIVATE, make a secrets.env file, and add two environment variables: Your RABBITMQ_URL and your full Node URI, which, you made a note of at the end of the Clearnet tutorial.
Your secrets.env should look something like this:
RABBITMQ_URL=amqps://uasdfasdffy:SEasdasdffasdlkfjalwe3_v6@grand-foo-bar.rmq3.cloudamqp.com/uasdfasdffy
NODE_URI=02a98c86ef366ce226aad6e7706959456ece226aad6ec3cbf527b37da143bb1441@146.190.169.210:9735
Start the script to monitor connectivity
Run this on LND WATCHTOWER NODE:
./start-remote-connectivity.sh
Assuming that your MAIN LND NODE is reachable through its clearnet address, you should see logs similar to:
send-connectivity-status-to-queue-1  | connected clearnet
send-connectivity-status-to-queue-1  |
send-connectivity-status-to-queue-1  | connected in: 1.2637522220611572
send-connectivity-status-to-queue-1  | {'is_in_error': False, 'connection_time': 1.2637522220611572, 'error_message': ''}
Great! Now let's look at our queues.
Look at our Queues, understand what we are doing
Back in our RabbitMQ console, we should see something like this:
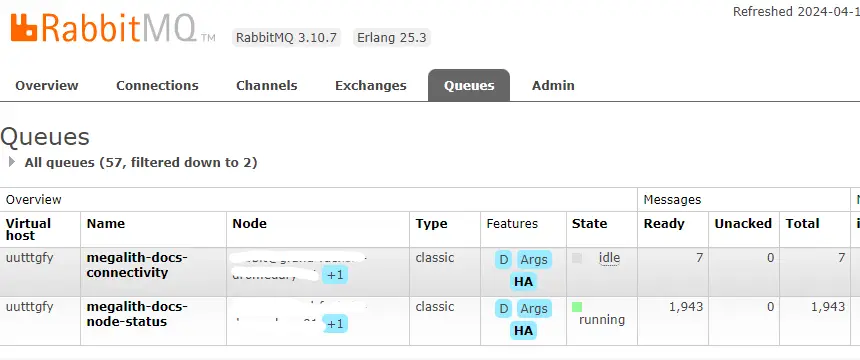
You can see now that both of our queues are accumulating messages. One queue is taking in messages from LND MAIN NODE, and the other is taking in messages from the LND WATCHTOWER NODE.
We're getting close now!
This is where you will need yet another VPS
So far, our setup, consists of "only" three computers:
- Our main LND node.
- Our watchtower/connectivity monitor node
- The VPS providing the Clearnet IP with Wireguard
We now have to boot up one more computer, because running our safety monitors on any of these computers is not a good idea, because these are the computers that we are monitoring!
Any Linux VPS should work fine... for example, a similar VPS as the one you established for Wireguard will work.
So we don't get confused, let's call this machine VPS QUEUE LISTENER.
Get on the command line in your new VPS
On the VPS QUEUE LISTENER, get on the command line. (This is computer #4 in our setup!)
-
Install Docker and Docker Compose with these directions.
-
reboot:
reboot
-
After you reboot, you can verify that Docker is working by running the
hello-worldcontainer -
Clone the
LND-With-Dockerrepository
git clone https://github.com/MegalithicBTC/LND-With-Docker
Here we are going to assume that you are using Pushover, and you've already acquired two strings: Your pushover USER and your pushover TOKEN. If you don't have that yet, start here: https://pushover.net/api
- In
pworker/PRIVATE, make asecrets.envfile, and add environment variables for yourRABBITMQ_URL,PUSHOVER_USER, andPUSHOVER_TOKEN
Your secrets.env should look something like this:
RABBITMQ_URL=amqps://uasdfasdffy:SEasdasdffasdlkfjalwe3_v6@grand-foo-bar.rmq3.cloudamqp.com/uasdfasdffy
PUSHOVER_USER=paste your user code from pushover.net
PUSHOVER_TOKEN=paste your token from pushover.net
Start monitoring your queues
On your new VPS, run this script:
./start-queue-listeners.sh
Your monitoring system is up and running!
Take some time to test your alarms
Review the alarm logic
First, have good long look at these two scripts:
This will give you an idea of what kind of data we are collecting, and how we are making decisions, and under what conditions we should send an alarm.
Simulate a failure by stopping your LND node
Remember, starting and stopping your node should be done delicately, using lncli commands.
Stop your node, and you should find that within about 30 seconds, your phone blows up with notifications!
Nice!